Cinebench Stress Test: How to Run It the Right Way
Use Cinebench as a real CPU stress test: how to set it up, how long to run it, what to watch, and when you need Prime95 or OCCT instead.
Cinebench is widely used as a CPU stress test, but most guides treat it like a simple click-and-score tool. The way you set up, how long you run it, and what you watch during the test all determine whether you get useful data or misleading numbers.
This guide covers the full picture: how to run a proper Cinebench stress test, what your score trends actually tell you, why scores drop mid-run, what the test catches versus what it misses, and how it compares to other tools. Whether you are checking a new build, validating an overclock, or diagnosing a thermal issue, you will find what you need here. You can download Cinebench free from our guide.
Is Cinebench Actually a Stress Test?
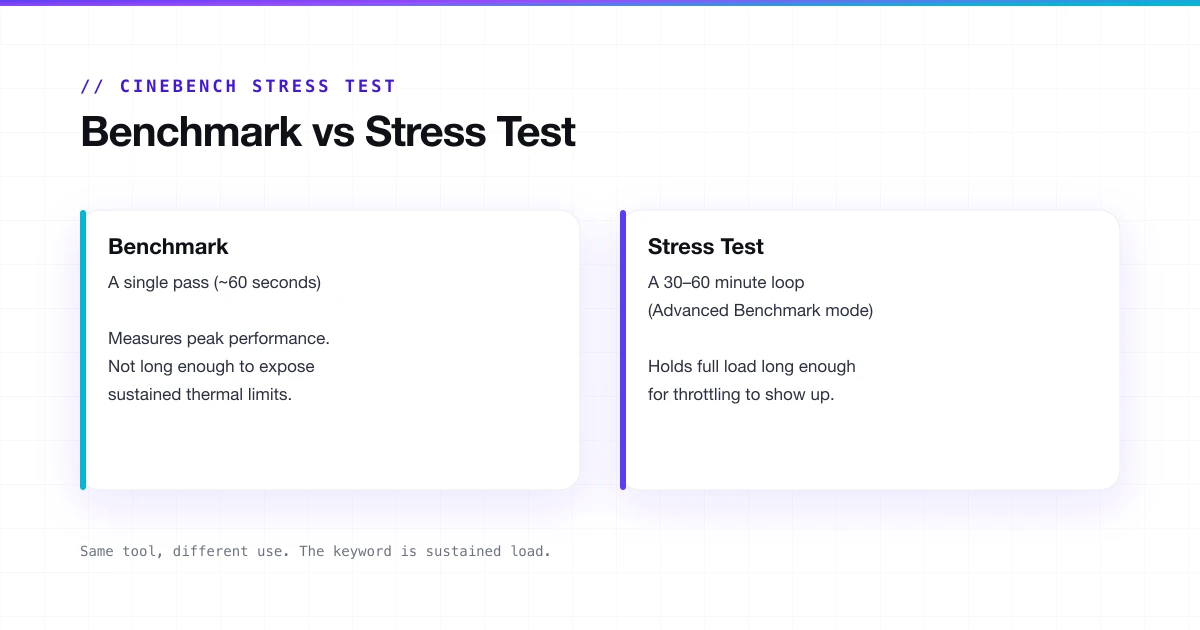
No, it was built as a benchmark. But in practice, the minimum multi-core run puts every thread on your CPU under full sustained load, which is exactly what a stress test does. The keyword is sustained. A single pass lasts around one minute: that is a benchmark. Running it on a loop for 30 to 60 minutes, or using Advanced Benchmark mode with a custom timer, is a stress test. Same tool, different use.
What makes it useful for stress testing:
- Loads all CPU cores simultaneously at 100% utilisation.
- A real rendering workload, not a synthetic made-up pattern.
- Exposes thermal throttling within the first few minutes.
- Crashes or errors during a run almost always point to instability.
- Free, fast, and widely understood across the hardware community.
Drawbacks:
- Does not test RAM, storage, or power supply stability.
- Does not use AVX instructions, so it misses a class of instability Prime95 would catch.
- A single short pass is not deep enough to confirm serious overclock stability.
- Score variation between runs is normal and does not always mean something is wrong.
Cinebench is the right first move. It catches obvious issues fast. If your system crashes here, you have a clear problem. If it passes cleanly, that is a good sign.
How to Set Up Before You Run
How you set up your device before running affects your results.
Close everything first: browser tabs, Discord, Spotify, antivirus scans, cloud sync, Windows Update. Even a music player running in the background can shave points off your score, and background tasks are the single most common reason for run-to-run variation.
Power and OS settings: set the Windows power plan to High Performance or Ultimate Performance before running. On a laptop, plug in first, because battery mode cuts CPU power limits and you will not see real performance. Disable any auto-boost or eco mode in your motherboard BIOS for the duration of the test.
Before an extended stress test: update BIOS and GPU drivers to the current versions before testing a new overclock. Do one warm-up pass first, then run your measured test, because thermal paste and the cooler take a few minutes to reach operating temperature. Open a temperature monitor alongside Cinebench so you can watch temps in real time.
How to Run the Cinebench CPU Stress Test
Standard pass (10 minutes)
- Open Cinebench 2026 or R23.
- Click CPU (Multi Core).
- Let it run and do not touch anything while it is going.
- Note your score and check your peak temperature when it finishes.
- Run it two or three times and compare scores; consistency matters more than peak.
Extended stress test (for overclocking or serious validation)
- Go to File > Advanced Benchmark.
- Set minimum runtime to 30 minutes for a basic overclock check, 60 minutes for stronger validation.
- Keep your temperature monitor open in a second window.
- Watch the score trend during the run; it should stabilize after the first few minutes.
- If the score keeps dropping, you are thermal throttling. If it crashes, your overclock is not stable.
| Purpose | Recommended Duration |
|---|---|
| Quick sanity check after a new build | 10 minutes, 2 to 3 passes |
| Validating a modest all-core overclock | 30 to 60 minutes |
| Serious OC stability confirmation | 60 minutes minimum, then pair with AIDA64 |
| Checking if your cooler is adequate | 10 minutes is usually enough to see throttling |
| Laptop thermal behavior check | 20 to 30 minutes to let temps fully stabilize |
Cinebench GPU stress test
Cinebench 2026 includes a GPU test using Redshift rendering. It loads your graphics card under a sustained render workload. This is useful for creative workstation testing, but it does not push GPU power to 100%. For maximum GPU thermal stress, you need a dedicated tool. For rendering stability checks, the Cinebench GPU test is fine. It supports RTX 5000 (Blackwell), RX 9000 (RDNA 4), and Apple M4 and M5, with 8 GB VRAM minimum on Windows or 16 GB unified memory on Apple Silicon.
What to Watch While Testing
The score at the end is just one number. What happens during the run tells you far more.
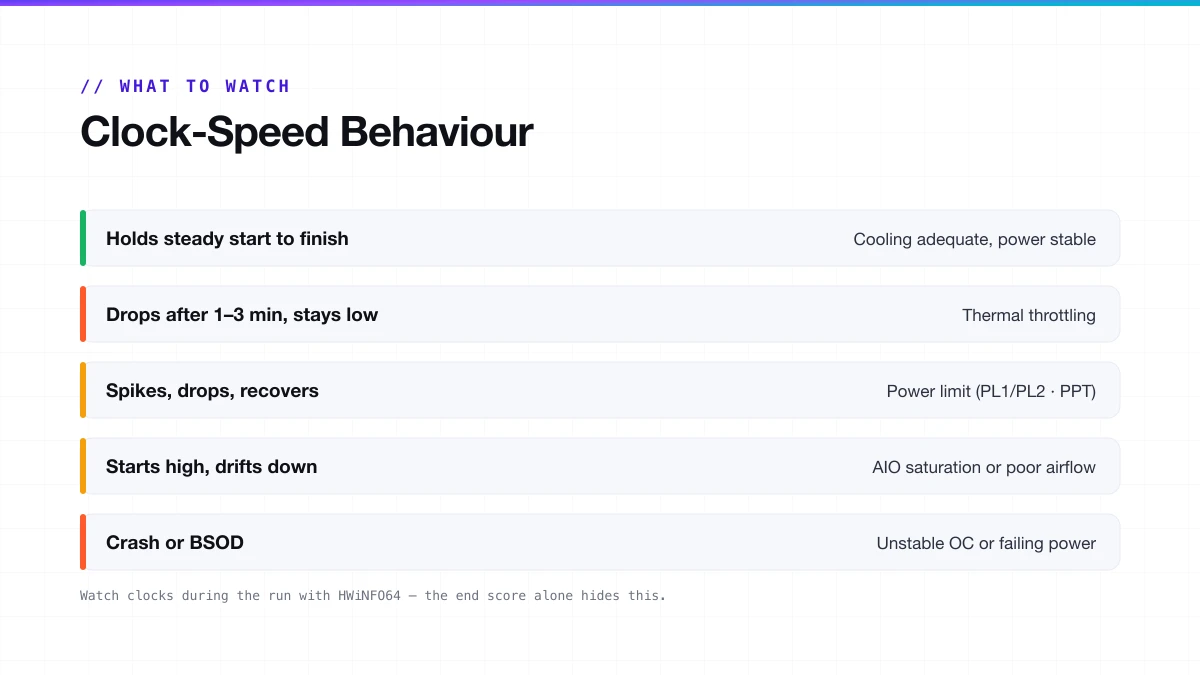
Clock-speed behaviour
| What You See | What It Means |
|---|---|
| Clocks hold steady start to finish | Cooling is adequate, power delivery is stable |
| Clocks drop after 1 to 3 minutes and stay low | Thermal throttling; the cooler cannot keep up |
| Clocks spike, then drop, then recover | Power limit throttling (PL1/PL2 on Intel, PPT on AMD) |
| Clocks start high, then progressively drop | AIO coolant saturation or poor case airflow |
| System crash or BSOD | Unstable overclock or failing power delivery |
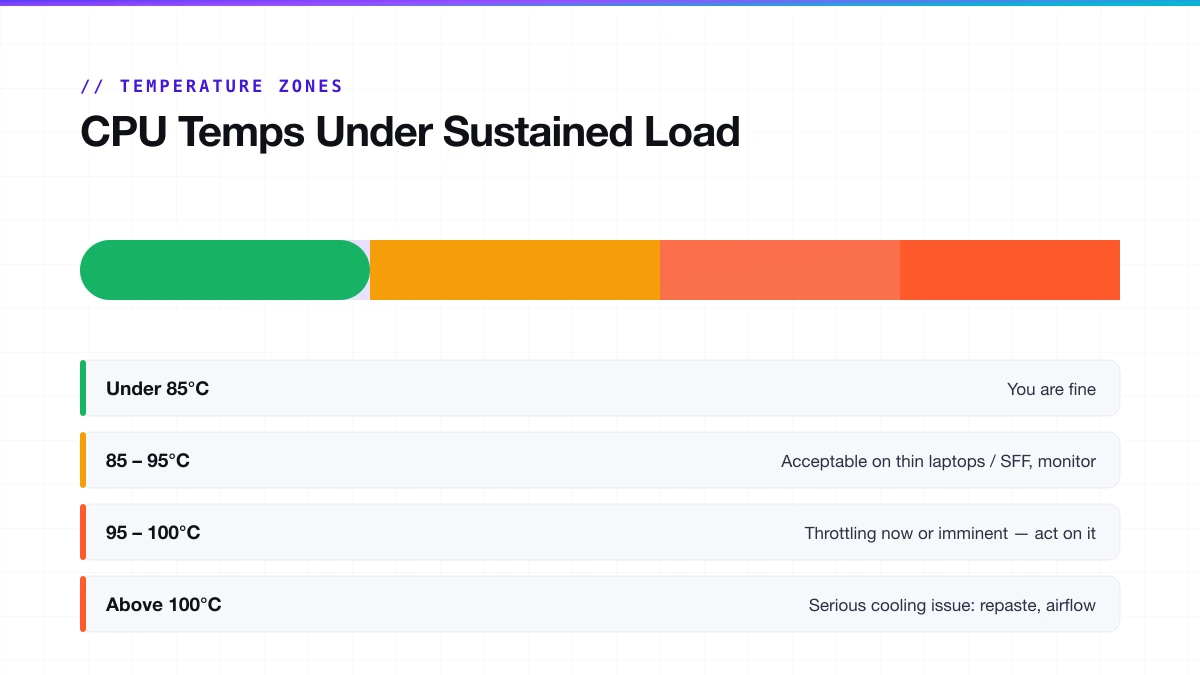
Temperature zones
| CPU Temp During Sustained Load | What to Do |
|---|---|
| Under 85°C | You are fine |
| 85 to 95°C | Acceptable on thin laptops and small form factor builds; monitor carefully |
| 95 to 100°C | Throttling is already happening or about to. Act on this |
| Above 100°C | Serious cooling issue: repaste, check cooler mounting, improve airflow |
Score trend
A healthy system produces a score that stabilizes. It might dip slightly in the first minute as the CPU hits thermal equilibrium, then hold. If your score keeps falling progressively across 20 to 30 minutes, that is thermal throttling that gets worse over time, usually a sign that your cooler is not up to the sustained workload.
Mistakes People Make Running This Test
These are not edge cases. They are the things that produce bad data and send people to forums convinced their CPU is broken.
- Running it immediately after boot without warming up. Your first run after a cold boot often scores lower. Do a warm-up pass first, then take your measured run.
- Comparing scores across Cinebench versions. R23 scores and 2026 scores are on completely different scales with different engines. They cannot be compared. See our Cinebench 2026 scores database for the right reference.
- Running on battery on a laptop. Battery mode limits CPU power to extend runtime. Your score will be significantly lower and tells you nothing useful.
- Treating one single pass as a stress test. One short run is a benchmark, not a stress test. To catch thermal issues, run Advanced Benchmark mode with at least a 30-minute timer.
- Ignoring the score trend and only looking at the final number. If your score starts at 20,000 and ends at 14,000, that is thermal throttling in action.
- Panicking over small run-to-run variation. A difference of 2 to 5% between passes is completely normal. Look for large differences or a consistent downward trend.
Cinebench Stress Test Accuracy
Cinebench is accurate for what it is designed to measure. It runs a real rendering workload that closely reflects actual 3D rendering tasks. Within that scope, the results are reliable.
What it catches reliably: thermal throttling under sustained all-core load, obvious overclock instability (a crash or error during the run), cooling-system inadequacy, power-limit behaviour (watching the score trend reveals PL1/PL2 transitions clearly), and performance regression after hardware changes like repasting or cooler swaps.
What it does not catch: memory instability, AVX-specific instability, long-duration marginal instability, and PSU inadequacy under combined CPU and GPU load.
A starting point, not a certification
If you pass Cinebench and still see crashes in other applications, the problem is likely AVX instability, memory instability, or something GPU-related. Cinebench is the first move, not the final word.
Cinebench vs Other Stress Test Tools
You do not have to choose one tool. Each covers different ground.
| Tool | What It Stresses | Duration to Trust | AVX | Cost |
|---|---|---|---|---|
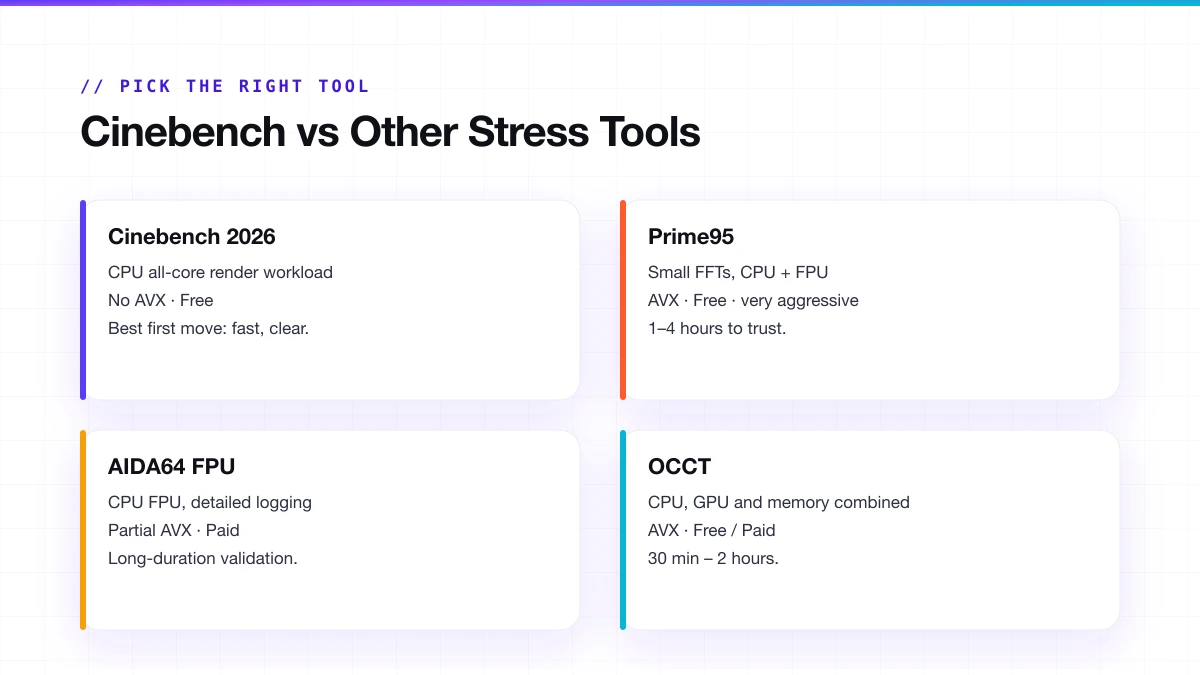
| Cinebench 2026 | CPU all-core, rendering workload | 30 to 60 minutes | No | Free |
| Cinebench R23 | CPU all-core, lighter workload | 30 to 60 minutes | No | Free |
| Prime95 (Small FFTs) | CPU and FPU, very aggressive | 1 to 4 hours | Yes | Free |
| AIDA64 FPU | CPU FPU, detailed logging | 1 to 12 hours | Partial | Paid |
| OCCT | CPU, GPU and memory combined | 30 minutes to 2 hours | Yes | Free / Paid |
Always start with Cinebench. Fix any crashes or throttling before moving to longer tools. For gaming overclocks, a clean 60-minute run is enough. For workstation builds or serious AVX-heavy overclocks, follow it up with Prime95 or AIDA64 once Cinebench passes.
How to Fix a Low or Failing Cinebench Stress Test
Thermal issues (score drops, temps too high): repaste your CPU, check cooler mounting, fix case airflow, and update fan curves in BIOS to ramp up sooner under sustained load.
Software and settings issues (score lower than expected): close all background applications before running, set the Windows power plan to High Performance or Ultimate Performance, check BIOS power limits, and if you are on Windows 10 with a Ryzen CPU, consider upgrading to Windows 11.
Overclock instability (errors or crashes): reduce all-core voltage slightly if scores vary significantly between identical runs, run fewer active cores if you are pushing very high per-core frequencies, and check memory stability separately.
Frequently Asked Questions
Is Cinebench a stress test or a benchmark?
A single short pass is a benchmark. Running Advanced Benchmark mode for 30 to 60 minutes is a stress test. The 10-minute default sits in the middle, useful for a quick thermal check.
How long should I run Cinebench as a CPU stress test?
For stock-speed systems, 10 minutes across two or three passes is enough to catch cooling issues. For overclocking validation, run 30 to 60 minutes in Advanced Benchmark mode.
My Cinebench score is dropping mid-run. Is something broken?
No. On Intel CPUs at default settings, the score drops when the CPU moves from its short-duration boost (PL2) to its long-duration sustained limit (PL1). This is normal.
Why does my score change between runs?
A small variation of 2 to 5% between passes is normal. Large variation, or a consistent pattern of lower scores each time, usually points to background load, thermal saturation, or marginal overclock instability.
Does Cinebench test the GPU?
Cinebench 2026 includes a GPU test using Redshift. It measures rendering throughput under a sustained workload but does not push GPU power to its maximum. It works well for testing rendering stability on creative workstations; it is not a gaming GPU stress test.
Can Cinebench damage my CPU?
No. It loads the CPU within its rated operating limits. If your system crashes during Cinebench, that is your overclock or hardware failing, not the tool causing damage.
What should my MP ratio be?
Your MP Ratio is your multi-core score divided by your single-core score. Ideally it should be close to your core count, but it always falls short because full all-core load drops per-core boost clocks. See our MP Ratio guide for the full breakdown.
New to Cinebench?
Start with the full guide: how to download, run, and read every score, version by version.
Read the complete Cinebench guide →// Continue reading
Cinebench MP Ratio: What's Good & How to Fix a Low One
Your Cinebench MP Ratio shows how well your CPU scales across all cores. See what a good ratio looks like by core count and how to fix a low one.
Read guideCinebench 2026 Scores: Full CPU & GPU Database
Cinebench 2026 CPU and GPU scores, score ranges by tier, and what a good score looks like, plus R23 reference data and how the scale changed.
Read guide